Welcome to today’s post on my step by step tutorial on how to make a card for a friend with Lovely Words Thinlits. Before I kick off just make sure you check out the Clearance Rack as lots of great things have been added and they always sell out fast! With up to 60% off original price they won’t hang about!
 Click here to see the Clearance Rack now.
So, back to my original theme! It’s a bit of a mouthful but I wanted it to be clear so you can search again for this later on if you want to! This card evolved from many different colours and versions. Does that happen to you sometimes – things you think should work just don’t? This was one of those cards, but I’m glad I persevered because I like how it turned out in the end!
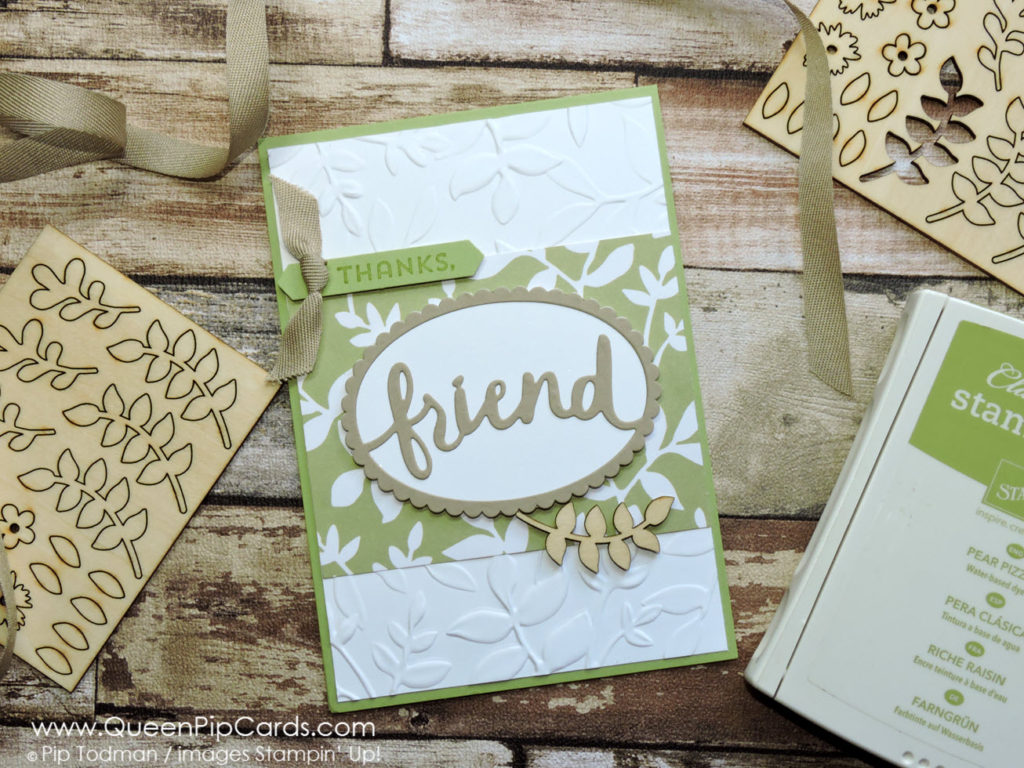 Step by step tutorial on how to make a card for a friend with Lovely Words Thinlits
- First, cut Pear Pizzazz card stock (European A4 size) with the short edge at the top; cut at 10.5 cm & score at 14.9 cm.
- Next use Whisper White for your first layer cut 14.4 x 10 cm and run it through the Big Shot with the new Dynamic Layered Leaves Embossing Folder (sooo pretty!)
- Cut a piece of A Whole Lot of Lovely Designer Series Paper to 10 x 8 cm and attach to the Whisper White piece in the centre.
- Attach these layers now to the front of your card base.
- Next you cut a Whisper White Scalloped Oval use the Layering Oval Framelit Dies. The piece of card to use is 9 x 7 cm.
- Now cut a piece of Crumb Cake card stock with the Friends die from the Lovely Words Thinlits (same size).
- Stick the Crumb Cake over the Whisper White. Mount onto the paper with Stampin’ Dimensionals.
- Stamp “Thanks” from Lovely Inside & Out stamp set in Pear Pizzazz on a piece of Pear Pizzazz card stock.
- Punch out with the Classic Label Punch keeping the word to the right end of the punch and attach with Stampin’ Dimensionals.
- Tie a knot in Crumb Cake Classic Weave Ribbon and glue dot onto the Thanks label.
- Using a Glue Dot attach a sprig of leaves from Touches of Nature Elements. These are really cute wooden elements that add an extra touch of “va va voom” to your card! It also balances out the sentiment & ribbon on the left.
 I know it looks like a lot of steps, but it isn’t really. You can make this card in about half an hour, if you have all the pieces to hand!
Top Tip:
I recommend you always cut a few sheets of a new A4 pack in half. They are then ready to grab when you need them. Keep them in the front of your card pack so you know what colour they are.
Need to stock up? Click the images below to grab anything from My Shop – don’t forget to check out the Clearance Rack too!
I hope you’ve enjoyed my step by step guide on how to make a card for a friend with Lovely Words Thinlits. See you again soon.
Crafty hugs, Pip x
Stampin’ Up! Demonstrator Pip Todman
#QueenPipCards #StampinUp #papercraft #InspiringYourCreativity
– Use my Monthly Giveaway Code for all orders under £150 in the Host Reward box on your Basket screen online. I will send you a special thank you from me and a share of the rewards next month. Ordering over £150? Keep the rewards for yourself! Click here to read more .


– Click HERE to Join my fabulous team the Royal Stampers today! Just £99 for £130 worth of products! Click here to Join now! or Click here to read about us!
– Click HERE to become a Crafty Corner Member on Facebook!
– Fill in the Subscribe form below to keep up to date with all the news and get exclusive projects from Queen Pip Cards
0 Comments